homesteading.com
Woven Pipe Cleaner Cans To Make With The Kids
Looking for Quick, Easy Kids Crafts that Are Actually Worth Keeping Around?
This kids craft project is really simple, easy to make, and cheap. It is cute, it uses recycled cans and inexpensive pipe cleaners, and the end product looks great. Plus, this cute woven pipe cleaner can will helps your children organize their things, which they are more likely to do since they helped make it. The only items you may need to buy are pipe cleaners, and you can find cheap pipe cleaners at any dollar store. We love dollar store craft projects, and this is a good one. Hopefully, this craft is simple enough to remember, and you will not need to reference this at all after you see the tutorial. I love teaching children how to make things and have probably done instruction on over 200 projects. This is a favorite, for simplicity, cost, and wow factor of final product.
I also love projects where I can keep the children busy without full time hands on supervision. My favorites are one that you can explain to the child, and then periodically check on their progress. Plus, I think almost any child would rather feel he or she can do something “all by myself,” no matter how much help they actually need.
For this project, you will need to teach your child to weave, if they do not already know how. Mine all learned in Montessori school, and came home with at least 100 woven items (per child ) so I think that weaving must teach children important skills. Anyway, weaving is easy to teach, and allows children to practice their fine motor skills. They also get to learn to follow a pattern, or at least try to.
This pipe cleaner craft project is great for kids ages 4-12. Weaving improves fine motor skills, and pattern making is educational, sparks creativity, and is fun for all ages.
I have seen lots of DIY tutorials for kids crafts, and there are not too many that you can show to your child so they will understand how to do the project. I am attempting here to make this one both you and your child can follow. It will be nice if I succeed, as so many kids have an electronic device of some sort you can leave them with to reference. Please let me know how I did in the comments below. I will be adding more kids crafts projects soon and would also love to hear suggestions. We appreciate any and all feedback.
TIP: I like to keep pipe cleaners on hand, as they are a great thing to keep kids entertained, especially when you want them to entertain themselves for awhile. You will be surprised what they will create out of them. A couple of weeks ago, my daughter presented me with an abominable snowman finger puppet. Who knew? Anyone else have to hide their pipe cleaners from their kids?
Supplies You Will Need For These Woven Pipe Cleaner Cans:
One clean empty tin can with label removed (size can vary, but a pipe cleaner needs to go around it)
2 sets of 8 pipe cleaners in the colors of your choice
4 sets of 6 pipe cleaners in the colors of your choice
glue gun (this part will require adult supervision)
Step 1:
Gather your pipe cleaners. You will need about 8 of each for your two vertical colors (two sets of 8) and about 6 of each for your woven colors (four sets of 6) Depending on the size of your can, you will need more or less of these colors. You can always have them weave too many in and then take unneeded rows out. The only thing you need to determine before starting is that the circumference of the can is not greater than the length of a pipe cleaner. (Just wrap one pipe cleaner around whatever you are wanting to cover. You will then know if it is the right size)
Step 2:
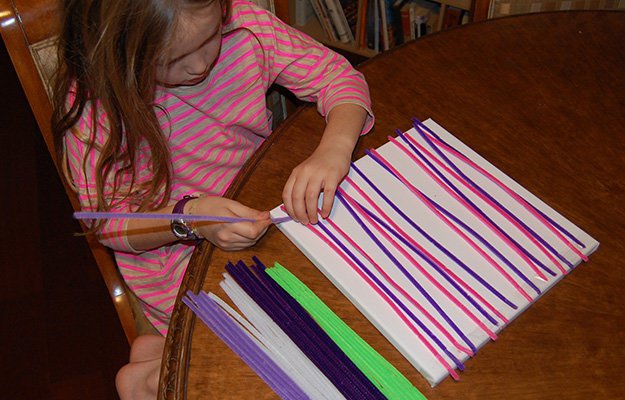
Layout your pipe cleaners for your pattern. I highly recommend finding a flat piece of cardboard or flat rectangular tray to work on, one you can put tape on. This makes it easier for your child to work, and also for them to carry the project around. We taped ours to a plastic covered canvas, but use whatever you can find.
Once you have your two vertical colors laid out, tape them to your board. We used scotch tape, but duct tape and other tape will work fine.
Step 3:
Using your other 4 sets of pipe cleaners, start weaving a pattern. Start with one, going over and under. For the next pipe cleaner, do the opposite, under and over. You will alternate weaving over and under, under and over until you have used all your pipe cleaners. As you work, you need to push the pipe cleaners up when you finish each row.
This pipe cleaner craft project is great for kids ages 4-12. Weaving improves small motor skills, and pattern making is fun for all.
Step 4:
Trim the ends of the pipe cleaners. Make sure first that your item is long enough to fit around the can. If you have too many, you can remove a row. If you need more, you can add some. On your horizontal rows, you can actually fold the ends of the pipe cleaners over or under, whichever be the case, and then trim them. For the vertical rows, you are going to want to leave at least a half inch to fold over the top and bottom of the can.
Step 5:
(**adult supervision and participation required**) Using a hot glue gun secure one side of your weave to the can. It is much easier to put the glue on the can than on the pipe cleaners. Press the edges of the horizontal woven pieces onto your can, being careful not to burn yourself on the hot glue.
TIP: I like to keep a CoolShot Hot Glue Guns around for older children who are not likely to burn themselves, and also for adults like me who are impatient .
Step 6
Tuck the ends of the pipe cleaner inside the can and under the bottom, bend inward to secure. Adhere with glue gun to ensure sticking, but this is optional, especially inside the can.
Like this post?
Be sure to like us on Facebook (button below) so you can be the first to know about latest project updates as well as great DIY articles.
Pin It so you can come back to it and follow us on Pinterest to get latest project pins.
Let us know in the comments below! Your feedback matters. The more interest we get in posts, the more likely we are to do more like that.
