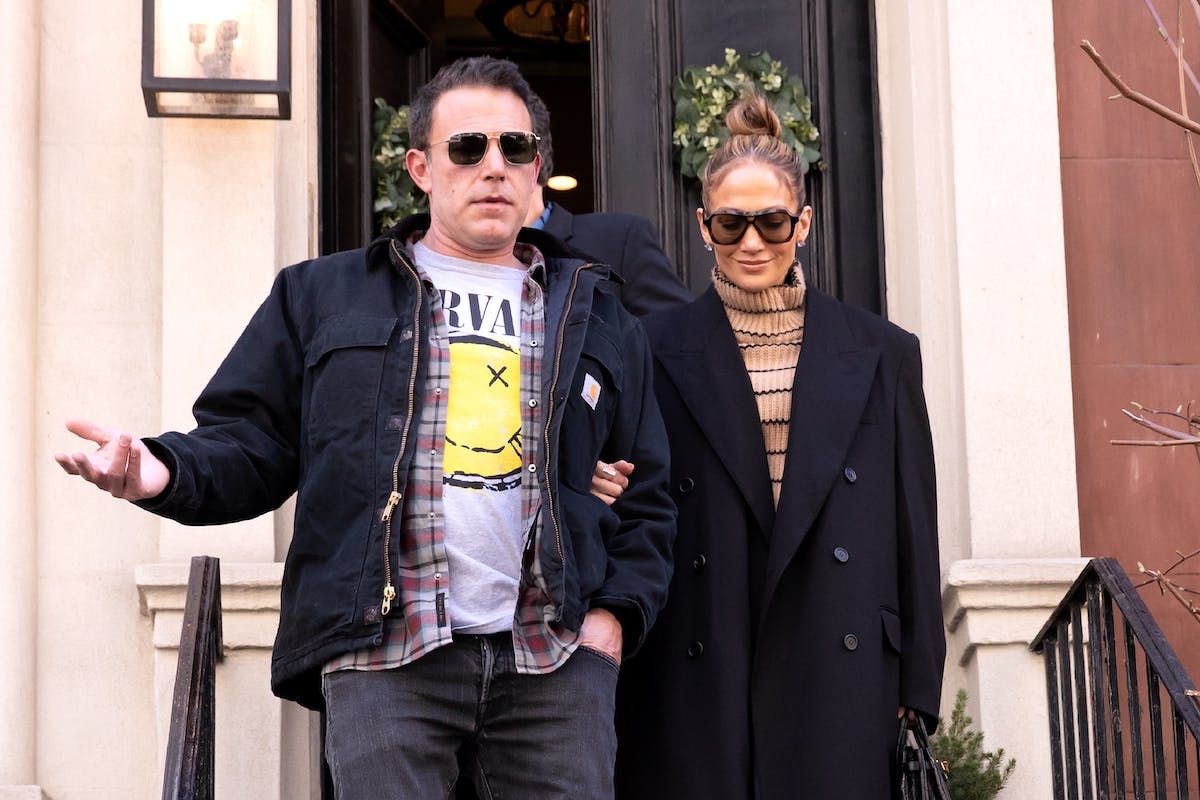
www.thecountrycook.net
Homemade Marshmallows
Learn how to make your own fluffy, delicious marshmallows from scratch with this easy-to-follow recipe and step-by-step pictures. Perfect for hot chocolate and s’mores!
EASY SWEET TREATS
Who doesn’t love marshmallows? They’re sweet, soft and fluffy little pillows! I used to be super intimidated to make something like this. I got this recipe years ago from a Betty Crocker cookbook and it hasn’t failed me yet! If you’ve never had a homemade marshmallow, then you are really missing out. They don’t taste like store-bought – they are absolutely phenomenal tasting and are perfect for making s’mores or to top your hot chocolate! I’ve included images for each step and I’ve added lots of tips so you know you’re doing it right.
FREQUENTLY ASKED QUESTIONS:
Where do I find unflavored gelatin powder in the store? Unflavored gelatin powder is usually in the aisle by the Jell-O powder. You may also find it by the pectin or jam and canning section. If you want to order it online, you can grab the Knox Unflavored Gelatin Powder from Amazon (paid affiliate). Can I make different flavored marshmallows? Yes. This recipe makes vanilla flavored marshmallows, but you can easily customize the recipe to make other flavors of marshmallows. Other extracts to use could be spearmint, peppermint, raspberry, strawberry, lemon, or even orange extract. If you are going to use one of those extracts, I’d reduce the vanilla extract to 1 teaspoon and then add ¼ teaspoon of whatever other extract at a time. Add more if needed. I suggest starting with a small increment and whipping between each addition until you get the flavor you want. Some of these extracts can be very potent, add too much and it may be too strong. Any tips for making the sugar syrup? When making the sugar syrup for the marshmallows, using a candy thermometer, not a meat thermometer is the way to go. You have to get the syrup to 240 degrees so the marshmallows will set up properly. The tip of the thermometer needs to be suspended in the syrup mixture, not sitting on the bottom of the pan which can inaccurately measure the temp. Don’t try to use a meat thermometer. You need a candy thermometer that is made to withstand the high temps. What if I don’t have a candy thermometer? If you don’t have a candy thermometer, you can still make these marshmallows. To check and see if the syrup is ready or not, get a bowl of cool water and add a ½ teaspoon of syrup to the water. If you see that the syrup dissolves into the bowl of cool water, the syrup is not ready for the next step yet. If it doesn’t dissolve but instead, forms a ball that you could pick up with your fingers and squish around, it is ready to use. If it forms a ball that is more firm and doesn’t squish easily, the syrup has cooked too long and is no longer in the soft ball stage. It can still be used but the marshmallows that you make with it will have a chewier texture. And finally, if when you drop the syrup into the water, it forms a hard crispy ball that can be broken into pieces, it’s cooked way too long and should just be tossed. If that happens, you’ll need to start over with fresh ingredients. Can I make colored marshmallows? Sure. Using this recipe, you’ll get bright white marshmallows. But if you want colored ones, add some food coloring to the mix. You can even make swirled marshmallows. Once the filling has been whipped, transfer half the mixture to the prepared baking dish and spread out. Add a few drops of food coloring to the rest of the filling still in the bowl. Beat the coloring into the mixture for about a minute to fully incorporate it. Then, use a spoon to transfer dollops of the colored mixture on top of the white filling in the prepared pan. Grab a knife and swirl the colored filling through the white mixture and then toss in the fridge to set as usual. Do I have to make square or rectangular marshmallows? Nope! If you want fun shaped marshmallows, instead of using a knife to cut the marshmallow brick once you’ve inverted it from the baking dish, grab some cookie cutters. Make sure to dust the cookie cutters with the powdered sugar, just as you would have the knife. Then use the cookie cutters to cut out different shaped marshmallows. How to store Homemade Marshmallows? Marshmallows can be stored in an airtight container for up to 2 weeks at room temperature.
INGREDIENTS NEEDED: (SEE RECIPE CARD BELOW FOR THE FULL RECIPE)
granulated sugar
light corn syrup– I know someone will want a substitute for this but I will just give a gentle reminder that light corn syrup is NOT high fructose corn syrup. They are different. You need this to make marshmallows.
water
unflavored gelatin– you don’t have to use the Knox brand, it’s just the one that I find the most in my grocery stores. You can use any brand of unflavored gelatin powder. I usually need 3 packets of the unflavored gelatin powder (about 7 1/2 teaspoons.)
vanilla extract– this gives your marshmallows a vanilla flavor. For other flavored marshmallows, check out the FAQ on suggestions on what to use and how much to adjust this recipe.
salt
powdered sugar– you need this to coat the work surface, bottom of the pan and surface of the filling as it sets. You’ll then also coat your knife with it to make cutting easier and coat your finished marshmallows for storing so they don’t stick together.
HOW TO MAKE MARSHMALLOWS
Add ½ cup of cool water and gelatin powder to a small bowl and whisk before setting aside. Add sugar, corn syrup, remaining ½ cup of water, and salt to a saucepan and bring to a boil over medium-high heat. Stir occasionally the sugar doesn’t burn or stick to the bottom of the pan. Heat mixture to 240F. I suggest using a candy thermometer (paid affiliate) to keep an eye on the temp safely.
Pour the gelatin from the first step into the bowl of a stand mixer with a whisk attachment ready to go. Turn the mixer on low and slowly add a steady stream of the hot sugar mixture to the bowl. Continue to mix for about a minute, or until gelatin starts to dissolve. Over time, increase mixer speed to high so it starts to whip the mixture for about 10-12 minutes until it cools. Once the mixture has cooled down and has become white and glossy in texture, add the vanilla extract. Continue to mix for about a minute or so, or until it’s fully mixed in.
Add a generous amount of powdered sugar to a 9×13-inch baking dish and coat generously.
Transfer marshmallow mixture to the powdered sugar coated dish and use an offset spatula to spread it out evenly. Cover with some more powdered sugar and let set for 8 hours, or overnight. Dust the work surface with more powdered sugar when ready to cut treats. Remove the baking dish from the fridge and run a butter knife along the edge of it to loosen the marshmallow filling. Flip the dish onto the sugar covered work surface. Gently tap the dish if you need help getting the filling out.
Dust your knife with powdered sugar before cutting the filling into your desired homemade marshmallow sizes. I find cutting lengthwise into 4 strips and then cutting each strip into 6 pieces works best for me.
Add more powdered sugar to the work surface or cover your knife with it as needed. I also suggest dusting your cut marshmallows with powdered sugar when storing so they don’t stick.
CRAVING MORE RECIPES?
Walking S’mores
Hot Chocolate Marshmallow Cookies
No Bake S’mores Treats
Hot Chocolate Poke Cake
Crock Pot Hot Chocolate
Print
Homemade Marshmallows
Learn how to make your own fluffy, delicious marshmallows from scratch with this easy-to-follow recipe and step-by-step pictures. Perfect for hot chocolate and s'mores!
Course Dessert, SnackCuisine American
Prep Time 20 minutes minutesChill Time 8 hours hoursTotal Time 8 hours hours 20 minutes minutes
Servings 24 servings
Calories 99kcal
Author Brandie @ The Country Cook
Ingredients1 cup water, divided use3 (0.25 ounce) packets unflavored gelatin1 ½ cups granulated sugar1 cup light corn syrup¼ teaspoon salt1 Tablespoon vanilla extractpowdered sugar
InstructionsAdd ½ cup of cool water and 3 (0.25 ounce) packets unflavored gelatin to a small bowl and whisk. Set aside. Add 1 ½ cups granulated sugar, 1 cup light corn syrup, remaining ½ cup of water, and ¼ teaspoon salt to a saucepan and bring to a boil over medium-high heat. Stir occasionally so the sugar doesn't burn or stick to the bottom of the pan. Heat mixture to 240F degrees. I suggest using a candy thermometer. Pour the gelatin from the first step into the bowl of a stand mixer with a whisk attachment ready to go. Turn the mixer on low and slowly add a steady stream of the hot sugar mixture to the bowl. Continue to whisk for about a minute, or until gelatin starts to dissolve. Over time, increase mixer speed to high so it starts to whip the mixture for about 10-12 minutes until it cools. Once the mixture has cooled down and has become white and glossy in texture, add 1 Tablespoon vanilla extract. Continue to mix for about a minute or so, or until it's fully mixed in.Add a generous amount of powdered sugar to a 9×13-inch baking dish and coat generously. Transfer marshmallow mixture to the powdered sugar coated dish and use an offset spatula to spread it out evenly. Cover with some more powdered sugar and let set for 8 hours, or overnight. Dust your work surface with more powdered sugar when ready to cut treats. Remove the baking dish from the fridge and run a butter knife along the edge of it to loosen the marshmallow filling. Flip the dish onto the sugar covered work surface. Gently tap the dish if you need help getting the filling out.Dust your knife with powdered sugar before cutting the filling into your desired homemade marshmallow sizes. I find cutting lengthwise into 4 strips and then cutting each strip into 6 pieces works best for me. Add more powdered sugar to the work surface or cover your knife with it as needed. I also suggest dusting your cut marshmallows with powdered sugar when storing so they don't stick. Then enjoy!
Notes
Please refer to my FAQ’s (Frequently Asked Questions) and ingredient list above for other substitutions or for the answers to the most common questions.
This could be done with a handheld electric mixer but it does take time to whip up so hang in there and be patient.
NutritionCalories: 99kcal | Carbohydrates: 23g | Protein: 2g | Fat: 0.1g | Sodium: 39mg | Sugar: 23g