www.theblaze.com
Alleged UFC 250 assassination plot targeted Republicans — and the Trump DOJ names suspects
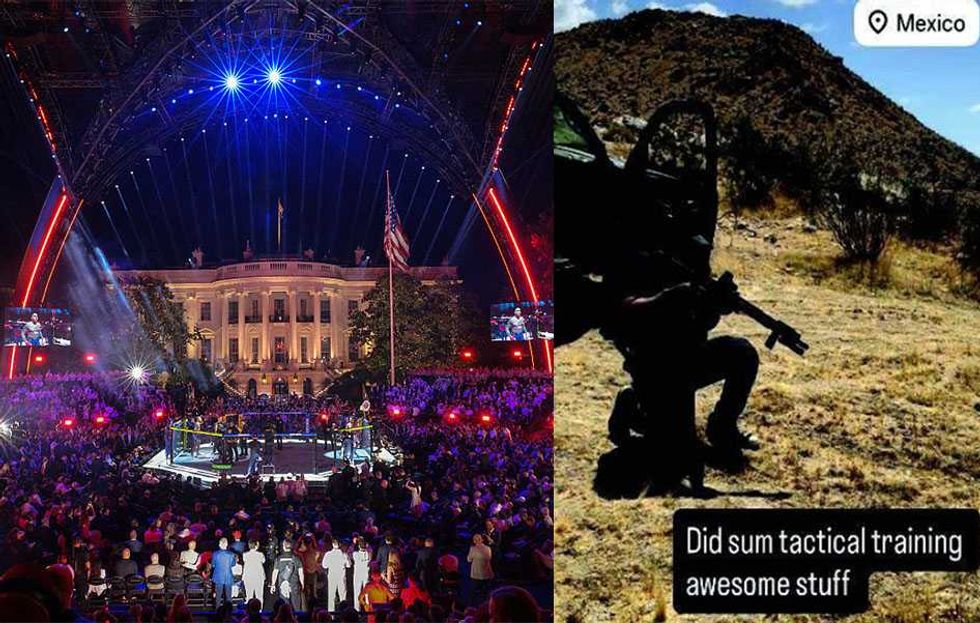
A Democrat-aligned lawfare outfit filed a lawsuit on behalf of a pair of anti-Trump protesters earlier this month in the hope of shutting down the UFC Freedom 250 event on the White House South Lawn last Sunday.Evidently, the Public Integrity Project and activist plaintiffs were not the only ones keen to rain on President Donald Trump's parade.'The landscape has changed.'The FBI announced on Tuesday that an alleged assassination plot targeting the UFC event was uncovered on June 10 and ultimately thwarted thanks to a timely phone call from a concerned mother and the rapid action of local and federal law enforcement agencies.Five men have been charged in the alleged plot to assassinate "high value targets" at the UFC event: Tycen C. Proper, 19, of Danville, Ohio; Bryan Omar Roa, 24, of Calimesa, California; Michael Alan Thomas 32, of Pinon Hills, California; Daniel K. Eskridge, 32, of Kidder, Missouri; and Abraham Hermosillo Alvarez, 31, of Omaha, Nebraska.According to the Justice Department, the suspects' plan consisted of two parts: First, they would use explosive drones in and around the event to prompt an evacuation; and second, they would deploy snipers to assassinate specific individuals within the fleeing crowd. In addition to the estimated 4,300 people present for the invite-only event on the South Lawn, there were roughly 85,000 additional people gathered nearby during the back-to-back fights.One of the suspects, Michael Thomas, allegedly discussed the four "tiers" of this anti-government plot: the first being the gunmen on the ground; the second being the drivers and drone operators; the third being logistical suppliers; and the fourth being social media suppliers.In addition to allegedly advocating for jail breaks for surviving tier 1 members in the aftermath of the planned attack, Thomas allegedly underscored the need for suspects to train for "gorilla [sic] style warfare."Another suspect, Daniel Eskridge, allegedly proposed that they form "5 teams of 3 each team consisting of 1 sniper, 1 tier one operator as support/ look out, [and] one drone operator."RELATED: James Comey-style 'threat' against Trump apparently etched into National Mall grass Screenshots of messages and maps on a suspect's phone and a photo of another suspect's equipment. Justice Department.Another suspect, Alvarez, allegedly suggested that snipers could escape to the Potomac River after taking their shots and identified an old church in Nebraska as a potential safe house.Multiple federal complaints filed in relation to the case across the country allege that Tycen C. Proper told investigators that the ball got rolling on the plan around March. While there were apparently more individuals involved in the discussions at the outset — roughly 19 — Proper allegedly claimed that the more serious plotters migrated their conversations to an encrypted chat app.The FBI alleged beyond amassing firearms, ammunition, and tactical gear at his Ohio home, Proper identified multiple targets, including multiple members of Congress and business executives.According to an affidavit submitted with Proper's complaint, the Ohio suspect proposed the following lawmakers as targets: Republican Senators Marsha Blackburn (Tenn.), Jim Justice (W.Va.), and Shelley Moore Capito (W.Va.), and Republican Representatives for West Virginia Carol Miller and Riley Moore.The targets were allegedly chosen in part because of their perceived coziness with the Israeli lobby.Trump, Vice President JD Vance, and Elon Musk's names were also allegedly floated as targets in the suspects' conversations.The affidavit indicates that the alleged plot — the purpose of which was to "jumpstart" a revolution in the United States — was foiled thanks to the vigilance of Proper's mother, who called law enforcement on the evening of June 10, expressing concerns about her son's recent conduct, including his firearm purchases and communications online.The Knox County Sheriff's Office and Danville Police Department arrived 20 minutes later and soon learned from Proper's father that the teen, who lived at home, was allegedly planning "recons" with individuals he met online; planning to leave to meet up with those individuals on the weekend of June 13; had spent roughly $3,000 of his graduation money to purchase camping gear, firearms, ammunition, plate carriers, and food; and had quit his job recently in preparation for his big excursion.The following day, the Knox County Sheriff's Office got the FBI involved.If convicted of conspiracy to commit murder, each of the defendants faces a maximum of life in prison and a $250,000 fine. They each face an additional five years in prison apiece if convicted of conspiracy to commit violence on the White House grounds."The FBI, our law enforcement partners and our U.S. attorneys did what they do every day to make America safe through quick response and vigilance in investigating, disrupting, and dismantling this alleged plan before it could be carried out," said acting Attorney General Todd Blanche."Protecting the president of the United States and the White House grounds is priority number one for the U.S. Secret Service,” said U.S. Secret Service Director Sean Curran. "The landscape has changed, and as a result we have seen a dramatic rise in threats against our protectees."Like Blaze News? Bypass the censors, sign up for our newsletters, and get stories like this direct to your inbox. Sign up here!