YubNub Social YubNub Social
    #freedom #americanhistory #amercia250
    Advanced Search
  • Login
  • Register

  • Day mode
  • © 2026 YubNub Social
    About • Directory • Contact Us • Developers • Privacy Policy • Terms of Use • shareasale • FB Webview Detected • Android • Apple iOS • Get Our App

    Select Language

  • English
Night mode toggle
Featured Content
Community
New Posts (Home) ChatBox Popular Posts Reels Game Zone Top PodCasts
Explore
Explore
© 2026 YubNub Social
  • English
About • Directory • Contact Us • Developers • Privacy Policy • Terms of Use • shareasale • FB Webview Detected • Android • Apple iOS • Get Our App
Advertisement
Stop Seeing These Ads

Discover posts

Posts

Users

Pages

Blog

Market

Events

Games

Forum

Living In Faith
Living In Faith
1 y

How to Have a Relationship with God
Favicon 
www.christianity.com

How to Have a Relationship with God

Want to grow closer to God but don’t know where to start? Discover five essential keys to building a thriving, personal relationship with Him. From quality time and communication to trust and obedience, learn how to deepen your connection with the Creator who loves you and longs to walk alongside you every day.
Like
Comment
Share
Living In Faith
Living In Faith
1 y

A Prayer for God's Protection in the New Year - Your Daily Prayer - January 8
Favicon 
www.ibelieve.com

A Prayer for God's Protection in the New Year - Your Daily Prayer - January 8

Child of God, you are protected. Christ follower, who claims and calls on Jesus as Savior, you will be protected. 
Like
Comment
Share
Daily Caller Feed
Daily Caller Feed
1 y

SHOSHANA BRYEN: Homegrown Terrorism In Our Military Is A Problem
Favicon 
dailycaller.com

SHOSHANA BRYEN: Homegrown Terrorism In Our Military Is A Problem

'The Department of Defense and the FBI have been reluctant to acknowledge the scope of the problem'
Like
Comment
Share
Daily Caller Feed
Daily Caller Feed
1 y

Melania Trump Reportedly Inks $40 Million Deal With Amazon
Favicon 
dailycaller.com

Melania Trump Reportedly Inks $40 Million Deal With Amazon

Melania is peeling back the layers of her previously private life
Like
Comment
Share
Homesteaders Haven
Homesteaders Haven
1 y

How to Make a Sawhorse
Favicon 
homesteading.com

How to Make a Sawhorse

Learn how to make a sawhorse with this easy tutorial. Assemble a sawhorse on your own with this! It's one of the most useful tools a homesteader can have. How to Make a Sawhorse Learning how to make a sawhorse is a very basic woodworking project. They can be made with all manner of wood and be any number of different sizes. The nice thing about making your own sawhorses is you can build them exactly the size you need, so you can make big ones to hold a table, small ones for cutting stands, giant ones for crowd control, etc. The cuts you will be making are all very basic, so if you are new to using power saws, this woodworking project is a good place to start. As always, you can use a handsaw if you're afraid of heftier tools, though your cuts are not going to be as clean. Supplies: (6) 1×3 lumber at 3 feet in length (you can go bigger or smaller, longer or shorter) (1) 3/4 inch x 5-1/2 inch plank or board at 3 feet in length. This board could be any length, but keep in mind that it will be your work surface and should be long enough to give you a comfortable amount of space to work on. (2) 1×3 lumber at 1 foot in length (1) Drill (1) 1/8 inch Drill Bit (1)Phillips Head Bit (1) Miter Saw (2) Wood Clamps (24) 2-1/2 inch Wood Screws (1) Pencil (1) Measuring tape *Remember, these board sizes and lengths can easily be changed to make a different sawhorse. These dimensions are just so you can follow along with exactly what we built. Step 1: Make the legs Cut four pieces of wood so that they are three feet long. We used 1×3 wood, but you could just as easily use a different sized wood throughout. If you DO use different sized wood, however, be sure and also use that same size wherever we mention 1×3 pieces in this tutorial. You can use a regular ‘ol handsaw for this as well. Step 2: Prepare your saw for angled cuts All miter saws are different, but all follow pretty similar principles. To make angled cuts with a miter, loosen the rubber handle at the front by twisting it counterclockwise. With your thumb, press down on the lever that is above the handle. This may not look exactly the same as yours, but it will likely be quite similar. Rotate the cutting board to 22.5 degrees. We are cutting our boards at 22.5 degrees so they will lay flush against the sides of our sawhorse when it is ready and angle out away from the horse to provide a steady base. Don't worry if this doesn't make sense yet, we have a degree in Wood Math from Beaver University…not really. Step 3: Clamp your legs for easy cutting After you have cut your four leg pieces, clamp them together with some wood clamps. We are doing this so we can cut all of our legs at once. Step 4: Make your first angled cut Make the first 22.5 degree cut to either side of your clamped, 4-board system. It does not mater which side so long as the boards are laying on slim-side as shown. Cut as close to the edge as you can while still getting a full angled cut. Be sure to practice safety when using power tools. Step 5: Make your second cut Cut the other end of the legs as well. Angle the cuts on the other side so that the sides run parallel to each other. Same as the first angled cuts, cut as close to the ends as possible. The end result will look like this: Step 6: Get your top piece Grab a board for the top of the sawhorse. We made our top board 3 feet long, which means that our sawhorse will be three feet long. In other words, this will give us three feet of space to saw things on. Your board could be longer or shorter – just pick a length that will give you ample room to work comfortably. We found this old board lying around the shop. Step 7: Get those legs on Attach the legs to the top board with screws. Begin every hole with a drill bit slightly smaller than your screw so that the wood does not split when the screw is fastened. We're using a 1/8 inch drill bit. Fasten the leg to the board with a screw. We used 2-1/2 inch wood screws, but any length will work so long as the screw can pass through the board and at least one inch into the leg. Hold the leg flush against bottom of your top board when drilling. The top of the leg should fit perfect under the board while the bottom of the leg should angle out and fit perfectly on the flat floor. Repeat this so that each leg has two screws attaching it to the board. Step 8: Do this for every leg Repeat this for every leg, creating two A shapes on either end of your top board as shown. Your sawhorse is almost there, but it is a little wobbly. Better add some support braces! Step 9: Make short support braces. Clamp two 1×3's on top of each other and make 22.5 degree angle cuts at each end. Flip those two pieces over and cut the other ends as well so that the cuts angle towards each other like you see below. Make these boards roughly 1-foot long. Angle these cuts toward each other. Step 10: Add the braces Align these braces with the table legs so that they are flush with the outside of the legs. If they are the same size, they will sit flush at the same height from the floor on both sides. Fasten the braces to each leg with two screws. As always, begin by first drilling a pilot hole with a drill bit that is slightly smaller than your screw. Pilot holes prevent the wood from splitting. Fasten the brace to each leg with four screws, two on each side. Repeat for the other side. Step 11: Cut long support braces for the sides Cut two boards to be the length of the table (again, 3 feet long in this instance). You don't even need to break out the tape measure again if you don't want, just place them next to the legs and mark the table's length with a pencil. The other board we used for this is a 1×3. Stack the marked 1×3 on top of another cut them to match, so you have two equal braces. We actually ran out of 1x3s in the shop, so we just used one 1×3 for one brace and a smaller 1×1 board for the other. Hey, you use what you got! Step 12: Attach long braces Attach the braces to each leg with two screws. Or, if working with thinner boards, just use one on each side. Complete this for both sides and you'll have a sawhorse that's great for, uh, sawing stuff.   That’s all, fellow homesteaders! Did you enjoy this tutorial on how to make a sawhorse? Let us know in the comments section below what you thought of this tutorial on how to make a sawhorse. Do you have a favorite method of building a sawhorse that’s a staple on your homestead? Share it with us and we’ll give it a shot. We love doing DIY homesteading projects and becoming more self-reliant by learning more about how everything works around the homestead. That’s why Homesteading was created. We want all folks looking to lead a self-sufficient life, either on a homestead or in an urban environment, to come together and learn from each other! Of course, we welcome your help in creating a community of homesteaders.  Come and share your homesteading tips and ideas, recipes and expect the best advice on self-reliance and homesteading trials from our team of long-time homesteaders, self-reliant wilderness, and preparedness experts. Want to write for Homesteading? Shoot us an e mail and make sure to stay in touch on Facebook, Twitter, and Pinterest! Do you have Instagram? Don’t forget to join us @HomesteadingUSA. Click here to Like Us on Facebook. Click here to Follow Homesteading on Pinterest.
Like
Comment
Share
Homesteaders Haven
Homesteaders Haven
1 y

Creative Corner Decor Ideas to Warm Your Home This Winter
Favicon 
homesteading.com

Creative Corner Decor Ideas to Warm Your Home This Winter

Winter is the perfect time to refresh your home and make it more inviting. When doing so, empty corners get overlooked often. However, these spaces hold great potential for style and added functionality. You can turn any corner into a cozy retreat using a few thoughtful tweaks. Here are corner decor ideas that combine comfort, personality, and practicality. Simple Ideas for Cozy and Stylish Spaces When it comes to decorating your home, the smallest spaces can have the biggest impacts. Transform overlooked corners into inviting retreats with a few thoughtful touches. From layering soft fabrics to choosing the right lighting, these ideas will help you create a cozy and functional nook perfect for any season. 
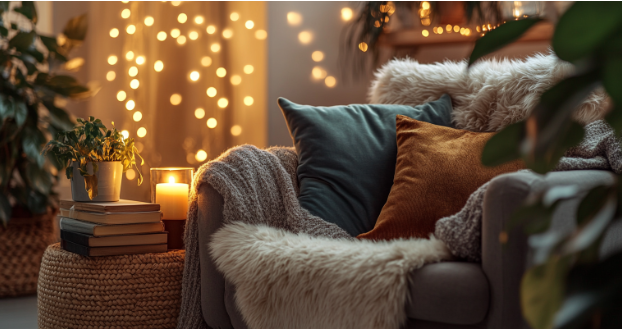
Create Layers of Comfort with Textiles Start with fabrics to make your corner warm and inviting. Soft materials provide texture and a sense of coziness. Throw blankets: Drape one over a chair or store a rolled-up blanket in a decorative basket for easy access. Pillows: Use a mix of materials like faux fur, velvet, and knit. This variety adds depth and visual interest. Rugs: Place a small area rug or a faux sheepskin to ground the space and define the area. Select colors that complement the season. For example, warm neutrals like taupe or deep jewel tones like emerald green work beautifully in winter. Illuminate Your Corner with Warm Lighting Lighting shapes the area’s mood. For your corner, focus on warm, soft lighting that feels soothing. String lights: Wrap them around shelves or window frames to add subtle sparkle. Candles: Place pillar candles of various heights on a tray for an elegant glow. Table lamps: Opt for lamps with fabric shades to create focused light perfect for reading or relaxing. Layering different lighting types ensures the corner serves both functional and aesthetic purposes. Explore ideas from Better Homes & Gardens to get started. Bring Life to the Space with Natural Elements Even in winter, natural accents add charm and energy to a space. Indoor plants: Choose easy-care varieties like pothos, ZZ plants, or snake plants that thrive in low light. Seasonal greenery: Fill a vase with pine branches, eucalyptus, or dried flowers to reflect the season. Earthy decor: Use woven baskets, wooden trays, or stone planters to add texture and warmth. Natural elements contribute to cleaner air and a calming vibe, as noted by experts at The Sill. Add Personality with Decorative Accents Infuse your corner with items that reflect your personal style. Accessorizing makes spaces feel thoughtful and intentional. Books and magazines: Stack a few favorites on a side table or shelf to give the area character. Photos and artwork: Display framed pictures or hang small prints for an elegant, personalized touch. Seasonal decor: Incorporate small touches like a garland, wreath, or snow globe to enhance the winter feel. These details create a corner that feels both curated and lived-in. Select Comfortable Seating for Functionality The right seating transforms your corner into a spot you’ll use often. Choose pieces that fit the space while providing comfort. Armchairs: Go for a cushioned chair, large enough to curl up in with a throw. Poufs or cushions: Perfect for smaller areas, they are versatile and easy to move. Benches: Add a padded seat and pillows to create a functional and stylish setup. Pair your seating with a small side table or ottoman for added convenience. Complete the Space with Inviting Fragrance Scent is a finishing touch that elevates the ambiance of your corner. Diffusers: Use essential oils like cinnamon, pine, or clove for a seasonal aroma. Simmer pots: Combine citrus peels, cinnamon sticks, and cloves in a pot of water for a more natural scent. Candles: Pick fragrances like vanilla or spiced apple to complement the cozy atmosphere. These aromatic elements engage the senses, making the space feel complete and welcoming. Enrich Your Home with Creative Corner Decor Ideas These corner decor ideas reimagine unused spaces into welcoming retreats. Start with layered textiles, add warm lighting, and incorporate natural elements to enhance the charm. Personalize with decorative accents, choose comfortable seating, and finish with an inviting fragrance. These simple updates ensure your home feels warm, functional, and uniquely yours this winter. What’s your favorite way to decorate a cozy corner? Share your ideas in the comments below! FAQs How do I make my corner decor look intentional? Focus on layering textures, adding warm lighting, and incorporating items that reflect your personality. What colors work best for cozy corner decor? Warm tones like taupe, rust, and emerald green are excellent for winter. Pair with simple patterns like plaid or herringbone. What kind of lighting should I use? Combine string lights, table lamps, and candles for a balance of functionality and ambiance. How do I decorate a corner on a small budget? Repurpose items you already own, like pillows, blankets, or books. Add affordable accents from thrift stores or DIY decor. Can I use my corner for storage too? Yes! Add baskets, shelves, or multi-functional furniture like a bench with hidden storage. How do I incorporate greenery into corner decor? Use low-maintenance plants like snake plants or add seasonal greenery like eucalyptus or pine branches. How can I make the space seasonally appropriate? Switch out pillow covers, add seasonal accents like garlands, and choose candles or scents that reflect the season. Can these ideas work in small apartments? Absolutely. Use compact furniture like poufs or folding chairs, and focus on vertical space with shelves or hanging decor. What’s a quick way to refresh a corner for winter? Add a warm throw blanket, swap pillow covers, and light a seasonal candle. How do I make the corner smell inviting? Use a diffuser, light scented candles, or simmer potpourri on the stove for a cozy fragrance.
Like
Comment
Share
Twitchy Feed
Twitchy Feed
1 y

CNN’s Dana Bash Misleads Viewers Trump’s Planning Military Invasions of Greenland, Canada and Panama
Favicon 
twitchy.com

CNN’s Dana Bash Misleads Viewers Trump’s Planning Military Invasions of Greenland, Canada and Panama

CNN’s Dana Bash Misleads Viewers Trump’s Planning Military Invasions of Greenland, Canada and Panama
Like
Comment
Share
Twitchy Feed
Twitchy Feed
1 y

Americans Over Illegal Aliens: Fetterman Pleads with Senate Democrats to Pass Laken Riley Act
Favicon 
twitchy.com

Americans Over Illegal Aliens: Fetterman Pleads with Senate Democrats to Pass Laken Riley Act

Americans Over Illegal Aliens: Fetterman Pleads with Senate Democrats to Pass Laken Riley Act
Like
Comment
Share
Twitchy Feed
Twitchy Feed
1 y

No More Apologies! Scott Jennings Explains Trump’s Vision of an Expansive Superpower America
Favicon 
twitchy.com

No More Apologies! Scott Jennings Explains Trump’s Vision of an Expansive Superpower America

No More Apologies! Scott Jennings Explains Trump’s Vision of an Expansive Superpower America
Like
Comment
Share
RedState Feed
RedState Feed
1 y

LA-Area Fires Continue to Rage Out of Control, 2900+ Acres, 10K Homes Threatened, Images Are Terrifying
Favicon 
redstate.com

LA-Area Fires Continue to Rage Out of Control, 2900+ Acres, 10K Homes Threatened, Images Are Terrifying

LA-Area Fires Continue to Rage Out of Control, 2900+ Acres, 10K Homes Threatened, Images Are Terrifying
Like
Comment
Share
Showing 59322 out of 115834
  • 59318
  • 59319
  • 59320
  • 59321
  • 59322
  • 59323
  • 59324
  • 59325
  • 59326
  • 59327
  • 59328
  • 59329
  • 59330
  • 59331
  • 59332
  • 59333
  • 59334
  • 59335
  • 59336
  • 59337
Advertisement
Stop Seeing These Ads

Edit Offer

Add tier


Select an image
Delete your tier
Are you sure you want to delete this tier?

Reviews

In order to sell your content and posts, start by creating a few packages. Monetization

Pay By Wallet

Payment Alert

You are about to purchase the items, do you want to proceed?

Request a Refund