homesteading.com
How to Make a Sawhorse
Learn how to make a sawhorse with this easy tutorial. Assemble a sawhorse on your own with this! It's one of the most useful tools a homesteader can have.
How to Make a Sawhorse
Learning how to make a sawhorse is a very basic woodworking project. They can be made with all manner of wood and be any number of different sizes. The nice thing about making your own sawhorses is you can build them exactly the size you need, so you can make big ones to hold a table, small ones for cutting stands, giant ones for crowd control, etc.
The cuts you will be making are all very basic, so if you are new to using power saws, this woodworking project is a good place to start. As always, you can use a handsaw if you're afraid of heftier tools, though your cuts are not going to be as clean.
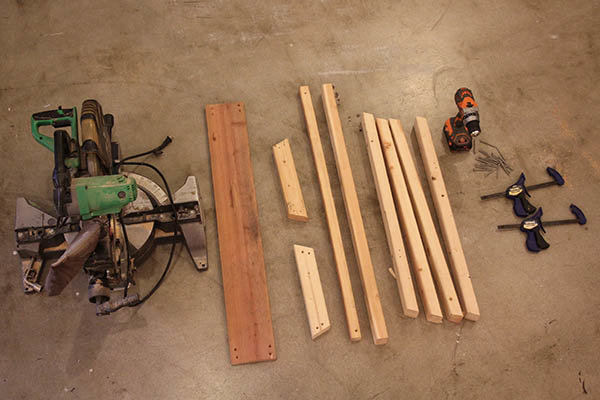
Supplies:
(6) 1×3 lumber at 3 feet in length (you can go bigger or smaller, longer or shorter)
(1) 3/4 inch x 5-1/2 inch plank or board at 3 feet in length. This board could be any length, but keep in mind that it will be your work surface and should be long enough to give you a comfortable amount of space to work on.
(2) 1×3 lumber at 1 foot in length
(1) Drill
(1) 1/8 inch Drill Bit
(1)Phillips Head Bit
(1) Miter Saw
(2) Wood Clamps
(24) 2-1/2 inch Wood Screws
(1) Pencil
(1) Measuring tape
*Remember, these board sizes and lengths can easily be changed to make a different sawhorse. These dimensions are just so you can follow along with exactly what we built.
Step 1: Make the legs
Cut four pieces of wood so that they are three feet long. We used 1×3 wood, but you could just as easily use a different sized wood throughout. If you DO use different sized wood, however, be sure and also use that same size wherever we mention 1×3 pieces in this tutorial.
You can use a regular ‘ol handsaw for this as well.
Step 2: Prepare your saw for angled cuts
All miter saws are different, but all follow pretty similar principles. To make angled cuts with a miter, loosen the rubber handle at the front by twisting it counterclockwise.
With your thumb, press down on the lever that is above the handle.
This may not look exactly the same as yours, but it will likely be quite similar.
Rotate the cutting board to 22.5 degrees. We are cutting our boards at 22.5 degrees so they will lay flush against the sides of our sawhorse when it is ready and angle out away from the horse to provide a steady base. Don't worry if this doesn't make sense yet, we have a degree in Wood Math from Beaver University…not really.
Step 3: Clamp your legs for easy cutting
After you have cut your four leg pieces, clamp them together with some wood clamps. We are doing this so we can cut all of our legs at once.
Step 4: Make your first angled cut
Make the first 22.5 degree cut to either side of your clamped, 4-board system. It does not mater which side so long as the boards are laying on slim-side as shown. Cut as close to the edge as you can while still getting a full angled cut.
Be sure to practice safety when using power tools.
Step 5: Make your second cut
Cut the other end of the legs as well. Angle the cuts on the other side so that the sides run parallel to each other. Same as the first angled cuts, cut as close to the ends as possible. The end result will look like this:
Step 6: Get your top piece
Grab a board for the top of the sawhorse. We made our top board 3 feet long, which means that our sawhorse will be three feet long. In other words, this will give us three feet of space to saw things on. Your board could be longer or shorter – just pick a length that will give you ample room to work comfortably.
We found this old board lying around the shop.
Step 7: Get those legs on
Attach the legs to the top board with screws. Begin every hole with a drill bit slightly smaller than your screw so that the wood does not split when the screw is fastened. We're using a 1/8 inch drill bit.
Fasten the leg to the board with a screw. We used 2-1/2 inch wood screws, but any length will work so long as the screw can pass through the board and at least one inch into the leg. Hold the leg flush against bottom of your top board when drilling. The top of the leg should fit perfect under the board while the bottom of the leg should angle out and fit perfectly on the flat floor.
Repeat this so that each leg has two screws attaching it to the board.
Step 8: Do this for every leg
Repeat this for every leg, creating two A shapes on either end of your top board as shown.
Your sawhorse is almost there, but it is a little wobbly. Better add some support braces!
Step 9: Make short support braces.
Clamp two 1×3's on top of each other and make 22.5 degree angle cuts at each end.
Flip those two pieces over and cut the other ends as well so that the cuts angle towards each other like you see below. Make these boards roughly 1-foot long.
Angle these cuts toward each other.
Step 10: Add the braces
Align these braces with the table legs so that they are flush with the outside of the legs. If they are the same size, they will sit flush at the same height from the floor on both sides. Fasten the braces to each leg with two screws.
As always, begin by first drilling a pilot hole with a drill bit that is slightly smaller than your screw.
Pilot holes prevent the wood from splitting.
Fasten the brace to each leg with four screws, two on each side.
Repeat for the other side.
Step 11: Cut long support braces for the sides
Cut two boards to be the length of the table (again, 3 feet long in this instance). You don't even need to break out the tape measure again if you don't want, just place them next to the legs and mark the table's length with a pencil.
The other board we used for this is a 1×3.
Stack the marked 1×3 on top of another cut them to match, so you have two equal braces. We actually ran out of 1x3s in the shop, so we just used one 1×3 for one brace and a smaller 1×1 board for the other. Hey, you use what you got!
Step 12: Attach long braces
Attach the braces to each leg with two screws. Or, if working with thinner boards, just use one on each side.
Complete this for both sides and you'll have a sawhorse that's great for, uh, sawing stuff.
That’s all, fellow homesteaders! Did you enjoy this tutorial on how to make a sawhorse? Let us know in the comments section below what you thought of this tutorial on how to make a sawhorse. Do you have a favorite method of building a sawhorse that’s a staple on your homestead? Share it with us and we’ll give it a shot. We love doing DIY homesteading projects and becoming more self-reliant by learning more about how everything works around the homestead. That’s why Homesteading was created. We want all folks looking to lead a self-sufficient life, either on a homestead or in an urban environment, to come together and learn from each other! Of course, we welcome your help in creating a community of homesteaders. Come and share your homesteading tips and ideas, recipes and expect the best advice on self-reliance and homesteading trials from our team of long-time homesteaders, self-reliant wilderness, and preparedness experts. Want to write for Homesteading? Shoot us an e mail and make sure to stay in touch on Facebook, Twitter, and Pinterest!
Do you have Instagram? Don’t forget to join us @HomesteadingUSA.
Click here to Like Us on Facebook.
Click here to Follow Homesteading on Pinterest.